Nero - Devil May Cry 5

Worn:
GAnime 2020 (Gatineau, QC) [unfinished at the time]
YetiCon 2022 (Blue Mountain Village, ON)
Status: Active
Why DMC5 Nero?
At the start of my original playthrough of Devil May Cry 5, I didn't really consider Nero as a costume plan. When I got towards the end of the game however, I grew to love him and started to consider it. Originally when I started to think about cosplaying him, I debated between either his DMC5 default outfit, or his DMC4 2nd costume. Unable to decide, I put it to a vote on my Instagram Story - needless to say, the DMC5 outfit won. But I will eventually make his 2nd costume from 4 SE. I also made the decision to make him as a super budget cosplay, seeing if I could make as much of the costume as possible using materials I already had - my max budget being $50.
Wig: Reused my Rocky in Silver from Arda Wigs Canada. This wig was originally my base for Shinkohyo. I want to try and find a way to use this wig for both characters if I can - if not, a new wig for Shinkohyo. It only required a bit of styling to look more like Nero's hair.
T-shirts: I used fabrics leftover from previous projects. I used a large t-shirt I already owned as a base pattern and made both to that pattern. The shirts are sewn together at the shoulders. There's only red sleeves however. The holes in the shirts were cut just by grabbing the fabric and cutting. Inside of the white shirt was finished with bias tape to prevent severe fraying.
Pants: I used a men's pants pattern that I already had as a base. Before sewing the fronts and backs together, I created my knee pads, using extra of the material and some interfacing. I sewed them on top, and then finished the pants as needed.
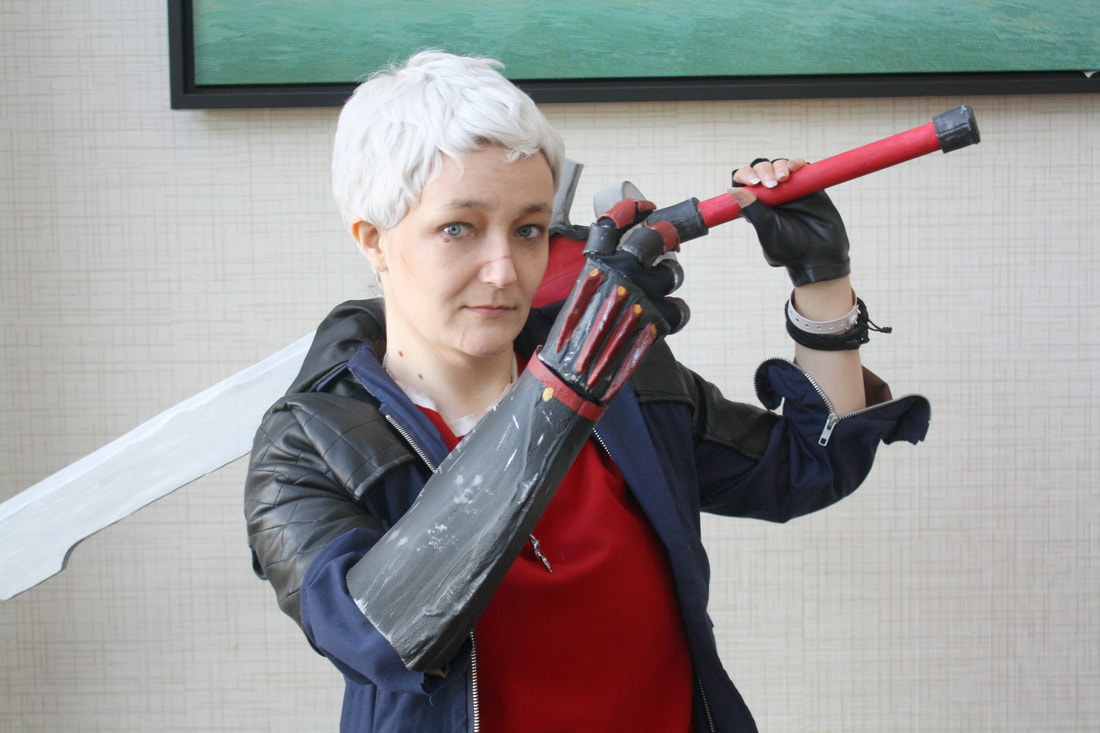
Glove: My glove was pretty simple. I took a pair of faux leather gloves that I had bought a number of years ago, and, using only the left one, cut the fingers off. I re-secured the ends to prevent them from falling apart.
Jacket: Truly the most challenging part of what I finished before GAnime. I modified the Organization XIII coat pattern I made last year, adapting it to work for Nero's jacket. I had 12m of this navy fabric that I'd gotten when the local Sears warehouse closed. I learned how to do quilting for this project, individually quilting the shoulders, back, and hood pieces that were needed. The jacket was honestly much more challenging than I'd anticipated but it was fun!
Devil Breaker: I wanted to make one of the less seen done Devil Breakers, but that I knew was still relatively in my abilities to make. Armour is far from a strength for me, and decided I'd make Punchline - which is also my favourite one! The arm part is made of EVA foam and worbla, and honestly I just slide my hand through. The hand part is a glove I made that fits perfectly, and each piece to make it up is made of foam wrapped with Worbla. Each piece is individually painted, and to secure them onto the glove I used hot glue while wearing the glove.
Red Queen: The blade is made of pink insulation foam board, shaped on the belt sander, and have a strip of Worbla going down the length to help some stability. The details on the blade were done with EVA foam leftover from other projects. The hilt was made with 2 pieces of the foam board and a dowel. The blade and hilt secure into the guard with PL Foam and Worbla. I plan to upgrade the sword eventually.
Blue Rose is still pending.
Photos by Red Mage Cosplay and Photography
GAnime 2020 (Gatineau, QC) [unfinished at the time]
YetiCon 2022 (Blue Mountain Village, ON)
Status: Active
Why DMC5 Nero?
At the start of my original playthrough of Devil May Cry 5, I didn't really consider Nero as a costume plan. When I got towards the end of the game however, I grew to love him and started to consider it. Originally when I started to think about cosplaying him, I debated between either his DMC5 default outfit, or his DMC4 2nd costume. Unable to decide, I put it to a vote on my Instagram Story - needless to say, the DMC5 outfit won. But I will eventually make his 2nd costume from 4 SE. I also made the decision to make him as a super budget cosplay, seeing if I could make as much of the costume as possible using materials I already had - my max budget being $50.
Wig: Reused my Rocky in Silver from Arda Wigs Canada. This wig was originally my base for Shinkohyo. I want to try and find a way to use this wig for both characters if I can - if not, a new wig for Shinkohyo. It only required a bit of styling to look more like Nero's hair.
T-shirts: I used fabrics leftover from previous projects. I used a large t-shirt I already owned as a base pattern and made both to that pattern. The shirts are sewn together at the shoulders. There's only red sleeves however. The holes in the shirts were cut just by grabbing the fabric and cutting. Inside of the white shirt was finished with bias tape to prevent severe fraying.
Pants: I used a men's pants pattern that I already had as a base. Before sewing the fronts and backs together, I created my knee pads, using extra of the material and some interfacing. I sewed them on top, and then finished the pants as needed.
Glove: My glove was pretty simple. I took a pair of faux leather gloves that I had bought a number of years ago, and, using only the left one, cut the fingers off. I re-secured the ends to prevent them from falling apart.
Jacket: Truly the most challenging part of what I finished before GAnime. I modified the Organization XIII coat pattern I made last year, adapting it to work for Nero's jacket. I had 12m of this navy fabric that I'd gotten when the local Sears warehouse closed. I learned how to do quilting for this project, individually quilting the shoulders, back, and hood pieces that were needed. The jacket was honestly much more challenging than I'd anticipated but it was fun!
Devil Breaker: I wanted to make one of the less seen done Devil Breakers, but that I knew was still relatively in my abilities to make. Armour is far from a strength for me, and decided I'd make Punchline - which is also my favourite one! The arm part is made of EVA foam and worbla, and honestly I just slide my hand through. The hand part is a glove I made that fits perfectly, and each piece to make it up is made of foam wrapped with Worbla. Each piece is individually painted, and to secure them onto the glove I used hot glue while wearing the glove.
Red Queen: The blade is made of pink insulation foam board, shaped on the belt sander, and have a strip of Worbla going down the length to help some stability. The details on the blade were done with EVA foam leftover from other projects. The hilt was made with 2 pieces of the foam board and a dowel. The blade and hilt secure into the guard with PL Foam and Worbla. I plan to upgrade the sword eventually.
Blue Rose is still pending.
Photos by Red Mage Cosplay and Photography